Monday 28 September 2015

Continuity Editing - Reflection

Video Reflection 

For the layout of the video, I decided to follow a set sequence, in which an explanation of the editing technique is given, followed by a cinematic exemplar and then my own visual example. I felt that this is a simple and coherent way to present the varying editing techniques. 
However, upon analysing the final product, I found that it would be improved if further elaboration was given during the demonstration of each technique. This would be particularly useful within the Cross Cutting sequence, to explain that the two different shots are in fact occurring at the same time and not sequentially. 


Whilst capturing Shot Reverse Shot, the 180 degree rule was unintentionally broken, as the camera was placed on the opposite side to where it should have been placed, in order to capture the technique precisely. This would result in the viewers perception of where the characters are on the screen, to become disorientated.  As a result, when re-shooting this, I must ensure that the camera is placed on the correct side of the subject, in order to keep the feeling of continuity. 


The technique Match on Action was the most difficult to synchronise correctly, as timing is paramount in order to portray it technically right. The action, or movement of the subject must be matched within each shot, in order to create a seamless transition. 


Overall, the most challenging aspect of capturing and editing my own video examples, was creating a seamless flow of sequences that was authentic enough to represent the techniques correctly. By trying to achieve a variety of these techniques, I was able to develop and further my editing skills, in addition to my camera skills. 

Continuity Editing - Video

Practical Skills

Sound In Moving Image production 

Sound is a fundamental element of moving image production, therefore it is paramount to consider how it is captured. The camera microphone will not always be the most sufficient way of capturing audio, as a result the use of external microphones may be required. The source of the sound will determine what type of mic is used, certain things to consider are: the sensitivity of the recording device,  its ability to withstand specific sound pressure levels, its directional response and the range of frequencies it is able to capture.

In-built Camera Microphone - 
Using the camera microphone, on auto mode, resulted in poor audio quality overall. Although what was captured was more than audible, maximum clarity was not achieved.


Stereo Microphone -
By using the Zoom H1, audio was captured in a stereo format. Picking up the sound source from varying directions, hence giving an overall dimensional sound quality.


Shotgun Microphone -
The directional pick up pattern of this microphone ensured that the audio was captured with clarity, with little interference, producing clearly audible sound. 


Thursday 24 September 2015

New Wave


French New Wave - La Nouvelle Vague 

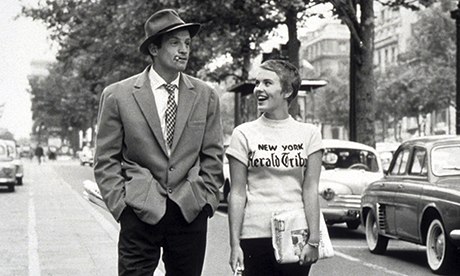
An artistic movement that had a profound influence upon film and cinema, renowned for 'blurring the lines between art and reality', giving birth to Auteur and evoking the rise of camera style. The movement predominantly consisted of young and vibrant film makers, who added a fresh sense of creativity to the film industry.

New wave first appeared in a sociological investigation of the phenomenon of the post war generation, published in L'Express. This survey involved 8 million French citizens, aged between 18 and 30 who were all asked questions relating to: fashion, morals, values and cultural behavior. Cinema was given a secondary importance and the findings were published in a volume, under the title 'La Nouvelle Vague'.

In the beginning, the guiding principles of French New Wave revolved around a complete rejection of  classical montage-style film making. The best films offered some sort of a personal artistic expression, bearing a stamp of personal authorship. So much so, each film maker was unique and distinct in their creation, however collectively, they compromised one of the most influential movements in cinema history.
The creators of these films, were not necessarily seeking mainstream success, but their work was drew great popularity, becoming critically acclaimed worldwide.


American New Wave -

This movement refers to at least three generations of American film makers. The first emerged during the 1950's in New York. A majority of these films were concerned with realism and depicting an authentic expression of American society at the time.

The second, often called the New Hollywood Generation, rose to prominence during the 60's, bring a new set of values representative of the counter-culture and an aesthetic influenced by the French New Wave.


More recently, in the late 80s and 90s, a new generation of filmmakers working outside the studio system and openly in debt to both the Nouvelle Vague and New Hollywood were awarded the mantle. What all these filmmakers shared in common was a desire to work independently of studio control and a belief in cinema as an art rather than mere entertainment.


Wednesday 23 September 2015

ISO Task


The type of lighting that is available on a shoot, will not only determine the overall exposure, it will influence the camera settings. The ISO dictates how sensitive the camera is to light, therefore the higher the ISO value, the more light will reach the sensor. It also means that there will be more grain/noise. I experimented with capturing a series of videos, using different ISO settings in an attempt to establish what visual differences manifest.

Initially, I wanted to capture the same video using two different ISO settings, therefore opted for a low value of ISO 100 and a relatively high value of ISO 1600.

Using ISO 100 resulted in a video that delivered detail with much more clarity, as opposed to ISO 1600. In the first video, the texture of the guitar strings, fretboard and even material that the subject is placed on has been captured. Whereas in the second video, not so much has been portrayed to that extent. Although the difference isn't so conspicuous, there are some variances, such as the overall brighter tone to the video shot with a higher ISO and the slight loss of detail on the texture of the surface that the guitar is lying upon. I specifically chose to incorporate rack focus into the shot, not only for visual purposes, but also to highlight the aspects of detail across the shot, when using different ISO settings.


Guitar - ISO 100


Guitar - ISO 1600

I found that shooting in low light situations can be challenging when trying to ensure that the correct exposure is achieved in each shot. I shot a set of candles using ISO 1600, which managed to illustrate the objects and produce relatively good exposure. Conversely, when shooting the same thing using ISO 100, I found that it was difficult to produce correct exposure and as a result I implemented the use of an external LED light source. When comparing the two shots, it is clear that the lower ISO setting produces much crisper detail, whereas the higher value creates some amount of grain and reduces the overall quality to some extent.

Candle - ISO 1600


Candle - ISO 100

I also shot outdoors to get a feel of how available lighting will affect exposure when manipulating the ISO setting. By focusing on a street lamp, I used ISO 1600, in order to capture the light source, as well as some of the detail of its surroundings. I used a tilt shot, in order to enhance the low light setting and how this affected the immediate surroundings of the subject. Again, I found that the overall quality was lost slightly and certain elements like, texture and dimension, were not delivered with such clarity.


Street Lamp - ISO 1600

On the whole, I found that when directly comparing each video, the most conspicuous difference was the amount of grain produced and how it degraded the overall quality of series of moving images. I felt that this task allowed me to explore and challenge my technical skills, particularly in regards to correcting exposure. I was able to experiment with varying sources of light and manipulate the situation in order to ensure I could capture what I intended to.

Friday 18 September 2015

Camera Shots - Video


Camera Shots and Movements

Unit 30 - Camera Shots

Camera Shots and Movement - Evaluation

There are varying elements that compose the visual aspects of film's language, including camera shots and movements.

From experimenting with capturing a range of these, I found that there was a diverse element of trial and error. Overall, I wanted to achieve a consistent level of quality in terms of composition, therefore I chose to shoot within a location that offered visual appeal and aesthetic, whilst not distracting from the predominant point of focus, therefore I chose a setting that displayed a range of neutral hues. In addition, I worked to incorporate such composition like rule of thirds  and Leading Lines, as well as making full use of the foreground, mid-ground and background.

For the Establishing Shot, I wanted to express the significance of the surroundings, however still keep the focus upon the subject; as a result, I decided to have them within the centre of the frame. The location itself formed a sense of natural balance and symmetry, complimenting the use of leading lines, allowing the viewer to follow the movement of the subject. Overall, I felt that this was a successful capture, as it combined good composition, with the depth and dimension of the shot type.


Correspondingly, the range of portrait style shots, from Long Shot to the Extreme Close Up, worked particularly well, as a result of composition and the fact that I chose to shoot them using a relatively shallow depth of field, to allow the predominant focus to fall upon the subject. However, as a result of the chosen location, I was faced with the issue of camera shake, due to the wind. To overcome this problem in the future, I would be sure to have a more steady camera set-up; using a fluid head tripod would be an appropriate option, as they provide more stability and are specifically designed to cater for moving image production.


For the Tracking Shot the most challenging aspect, was trying to get as little camera shake as possible. However, without the use of suitable equipment - such as a dolly - this wasn't easily achieved. Conversely, the hand-held element did provided a more authentic ambience, by really accentuating the organic setting and placement of the subject within the frame.


For the final video, I chose to have title slides that explain each camera shot or movement, as opposed to a voiceover, as I felt that this would provide more detailed, yet succinct explanations. Following this, cinematic examples are presented, to allow the viewer to recognise the shot in a more familiar format, then once they are able to identify and recognise it, my own example is presented.


I kept this order consistent throughout video and - with the use of bins - kept each of the files within their own folder to keep things organised and clearly laid out.


Overall, I feel that this project allowed me to explore, challenge and strengthen my own camera and editing skills, both technically and compositionally, which I can now implement into future tasks. 

Wednesday 16 September 2015

Unit 30 - Technical Skills

Aperture, Shutter Speed and ISO 


The technicality of a camera is vital to the overall production of moving image. There are three predominant settings that are paramount to consider.

ISO, which is ultimately the sensitivity of the camera towards a light source, determines how much grain or noise will affect the end product. Lowering the ISO value, will ultimately decrease the level of sensitivity, whereas increasing the ISO number will result in greater sensitivity. The element within the camera, which alters sensitivity, is the camera sensor. It is the part of the camera, that is responsible for gathering light and transforming it into an image (Photography Life 2009).

ISO 200 and ISO 3200 Comparison

A higher ISO value allows you to capture within a low-light environment, however the higher the sensitivity, the more grain is introduced to the shot (as displayed within the image above).

The Shutter Speed function, is what determines the length of time in which the camera's sensor is exposed to the available light source. Hence, the longer the shutter is open, the greater amount of time the sensor has to gather light. In low-light settings a longer shutter speed is typically required to ensure correct exposure, by allowing more light to reach the camera sensor.

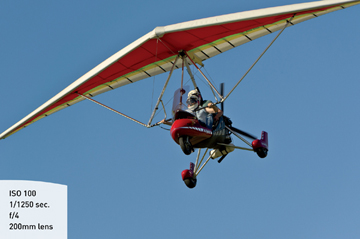
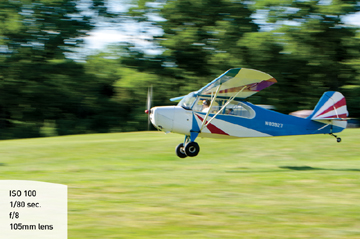
One of the major influences on the sharpness of an image, is based on camera shake and the subject's movement (Slyvan 2012). This means that a lower shutter speed is allowing more light from the subject into the camera, therefore their movement may appear less sharp, or may even produce blur. A greater shutter speed will produce less blur and capture more sharply.

Figure 4.3

Figure 4.4

Aperture is responsible for dictating depth of field, therefore determines how much of your shot is in focus. This is particularly useful when trying to isolate the subject, or an object in the foreground, whilst reducing distractions from the background. Aperture is represented with f/stop values, which is effectively relates to the focal length of the camera lens divided by the diameter of the aperture; a higher f/stop number, will result in more of the shot being in focus, as less light enters the camera and a lower value will increase the aperture, by allowing more light to reach the camera sensor, therefore producing more blur.


Depth of field, along with composition, is a major factor in how you direct attention to what is important in your shot (REVELL 2011). As a result it also adds some degree of aesthetic value.

Reference List:

MANSUROV, N. (2009) Photography Life: Understanding ISO [Online] Available from: https://photographylife.com/what-is-iso-in-photography [Accessed: 16th September 2015]

SLYVAN, R. (2012) Nikon D3200: From Snapshots To Great Shots. San Francisco: Peachpit Press.

REVELL, J. (2011) Canon EOS Rebel T3i/600D: From Snapshots to Great Shots. San Francisco: Peachpit Press.  

Tuesday 8 September 2015

Unit 30 - Videos


 Video Experimentation Using Different Light Sources


Low key Lighting -
Making use of artificial lighting, to illumine the subject and location, producing overall quite low key light. Shot as a stop motion sequence. Overall, as a result of the low light, the sequence appears quite grainy, as a high ISO setting has been used. To resolve this, a stronger light source could be used in order to increase the exposure, so that ISO can be reduced.


Studio Lighting -
Captured in an indoor set-up, using studio style lighting, at Birmingham Fashion Week 2015. The shallow depth of field highlights and accentuates the subjects, drawing the observers attention to the predominant focus. To increase visual appeal, more camera shots could have been used to experiment with, as this would add variety and dimension.


Natural Lighting -
Utilising natural sunlight in an outdoor set-up, with the use of racking focus to add visual depth and fully express the use of light. To improve the overall video, the use of a tripod could be implemented to eliminate camera shake, however the hand held aspect is what provides a more natural feel, complimenting the visual aspect. Furthermore, the low vantage point offers a more intimate feel, again this corresponds to the delicate and natural element.

Unit 30 - Lighting Techniques

Camera and Lighting Techniques for Moving Image

Lighting is a paramount technique to consider in regards to photography and moving image production. Not only does it help to achieve the perfect exposure, it also depicts the desired ambience and overall mood, adding depths of visual appeal.

The three predominant camera settings: ISO, depth of field and shutter speed, must be balanced to produce the correct exposure. Although lighting plays a significant role in this, it is possible to have good exposure, but poor lighting. In the two images below there is a conspicuous difference in lighting; on the left, the two objects are well illumined, however the overall image appears flat. Conversely, in the second shot, there is much more depth and dimension, which is a result of a more creative lighting set-up.

Earnest, A (2013) Lighting for Product Photography. Buffalo: Amherst Media.
There are numerous things to consider when arranging lighting in order to capture a scene; for example, depending on whether the lighting is hard or soft will determine intensity. Hard light creates a defined structure in regards to the subject, creating a noticeable difference between areas of light and dark, hence producing high contrast, typically used to compose dramatic intensity or ambiguity and often associated with villainous characters in film. It is also a quality of lighting that can be used to direct focus upon a specific object or subject in the scene. This may further be reinforced by backlighting; a light source is placed behind the subject which makes the outline specifically distinct. Soft light is achieved with a relatively large light source, creating less contrast and producing a more natural feel. 
It it easy to let lighting dominate a shoot, however making use of natural light that is already available in a location, is a good start. Try and find a happy balance between great lighting and great expression from the subject (Lawrence 2012).
Whereas, your first priority is to light for 'visibility', proper lighting is also an artistic endeavour. Every lighting situation is unique and must be approached from an individualistic direction. the lighting depends on the writer's concept of the production and partly on the requirements set by the location, budget, availability of equipment and time to create the lighting ambience desired. (Musburger and Ogden 2014).


Depending upon the desired feel, artificial lighting is often used along side available natural light in order to create specifically striking scenes. Manipulation of lighting portrays a setting in an alternative manner to how the eye would perceive it, providing the photographer's interpretation of it and allowing the observer to acknowledge this.


Light also has the potential to colour a scene with a range of hues, transforming it warm or cold. Therefore, colour temperature is also an integral quality of light. As light is composed of red, green and blue wavelengths, the way it is used and controlled will determine how the camera's white balance should be utilised.


Lighting is a technique - a way of using light to reveal shape, form and texture and to tell the desired story about the subject and its features (Earnest 2013). 

Reference List:
Earnest, A (2013) Lighting for Product Photography. Buffalo: Amherst Media.

Lawrence, J (2012) Photographing Shadow and Light. USA: Amphoto Books.

Kawauchi, R (2011) Illuminance. New York: Aperture Foundation.

Musburger, J. Odgen, M (2014) Single - Camera Video Production. 6th Edition. Burlington: Focal Press.